Photo by Hannah Troupe / Unsplash
If you ever wanted to amp up your sound design or craft the music you want to hear, using Ableton Live’s Audio Effects are a great place to start. You can add Audio Effects to MIDI instruments, audio inputs, and imported samples in Ableton Live, equipping you with endless sound-sculpting possibilities.
Essential Audio Effects for Mixing
1. Reverb
We’ll start off with the Reverb Effect. Reverb relates to how sound bounces and reflects off room surfaces and objects. If you want to prolong the duration of a sound or create the impression of space, adding reverb helps to ease your sounds into a mix while adding depth and atmosphere.
You can also think about reverb in the context of specific locations. Imagine how music in a bathroom would sound compared to music in a cathedral. Since those spaces have completely different layouts and architectural structures, the same sounds played in those environments would result in different reverberations.
The origins of reverb can also be traced back to early recording techniques from the 1920s. Recording artists would experiment with microphone placement to recording in different locations or rooms. Later on, inventions like the spring and plate reverb replicated those recording techniques in the form of actual devices.
Ableton’s Reverb Effect is similar to the spring and plate reverbs in the sense that you can filter sounds through a particular module in order to achieve a manufactured reverb effect.
How to Use the Reverb Effect:
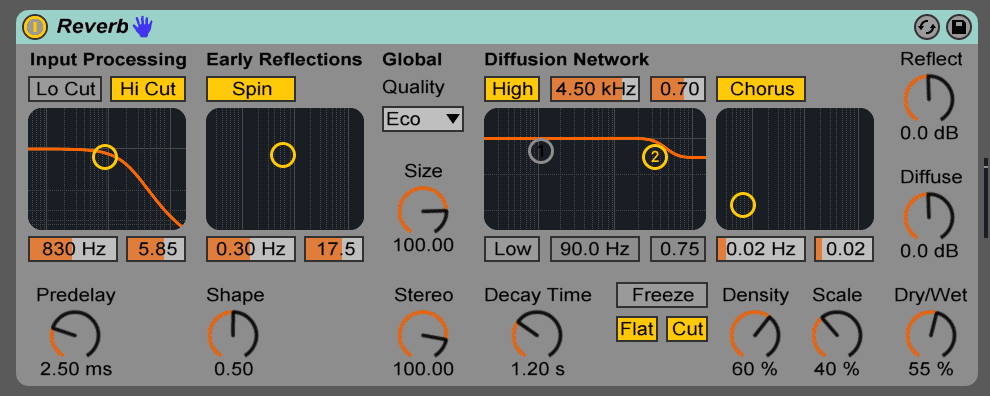
- To get started, we can take a look at some important parameters in Ableton’s Reverb Audio Effect. On the right-hand side, you have the output section with the Reflect, Diffuse and Dry/Wet parameters. The easiest way to immediately add some reverb effects would be with the Dry/Wet knob. At 0%, you’ll hear the unaffected signal, then as you mix in the reverb process signal, the amount of reverb in your track increases.
- The Reflect knob, also known as early reflections, helps give you a sense of the size of a space. Reflection can also be described as an instance where sound is emitted from a source, then bounces off of the surfaces of a contained space. You can hear early reflections after an initial sound is made that sounds similar to an echo.
- The Diffuse knob, or late reflections, refers to how those reflected sounds spread and linger into a space.
- You can also use the Size parameter to manipulate the size of a digital space (lower Size = smaller room, higher Size = bigger room).
- Decay Time controls how quickly the reverb starts to decay or until the reflection of a sound fades away.
When you’re trying to figure out how much reverb you need, a simple trick is starting off with the Dry/Wet knob at 100%, then gradually decreasing the amount to your liking. By starting off at 100%, you can immediately hear the reverb applied to a track and can adjust it to flow in with the rest of your mix from there.
Reverb can also be categorized by room types (ie: Room Reverb). You can also check out these different types of reverb to hear the distinctions.
2. Compressor
The Compressor Effect in Ableton Live boosts your sounds without losing its intensity and consistency. You can control how prominent you want your track to be without creating distortion, which also helps with adjusting its placement in the mix overall.
How To Use the Compressor Effect:
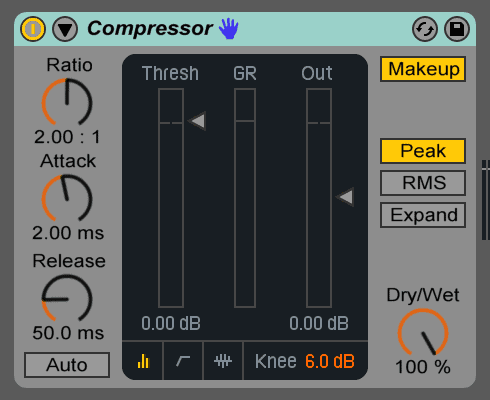
There are three modes to view the Compressor tool in Ableton: Collapse, Transfer Curve, and Activity Display. We’ll be focusing on the first two:
- In the Collapse View, you can get an overview of the Compressor’s primary controls.
- The Ratio parameter adjusts the ratio between the input and output signals.
- The Threshold parameter signals when the compressor will engage. As you lower the threshold, this causes a higher level of gain reduction and increases compression.
- If you increase the Attack, you may not hear the compressor engaging, where as a low Attack can cause sounds to fall flat. The same goes for the Release parameter. Adjusting the Release will affect when the Compressor will engage with an incoming signal.
- In the Transfer Curve view, you can see the ratio between the input and output levels of the Compressor.
- The Knee function (adjustable curve in Transfer Curve view) controls the impact of compression. Moving the Knee will cause compression to happen more subtly or harshly as it increases the Threshold.
- The Dry/Wet parameter in both of these views controls how present the compression is when it’s applied. A lower percentage would mean the compressor is barely heard, when at 100%, the compressor is in full effect.
3. EQ
The way a sound unique from other sounds mostly comes from the relationships between the frequencies a sound is made up of. An EQ enables you to adjust those frequencies by turning them up or down. Certain sounds in a mix can get lost or buried, so an EQ can help balance muddy sounds in a shared frequency space. Before music production, EQ’s came about from telecommunication used to correct tonal changes caused by the transmission of audio signals across telephone lines.
With EQ, you can control where the sound is located in a mix, what the timbre (tone, quality of a sound) will be and cut out any unwanted frequencies.
We’ll dive into some commonly-used EQs in Ableton Live:
EQ Three
- The EQ Three has 3 filters that split the audio signal into 3 adjustable frequency bands: low, mid and high. This type of EQ is effective in controlling a broader range of tone control in a track.
- In the EQ Three window, pressing the “L,” “M,” or “H” buttons would completely cut out those individual frequencies, while adjusting the individual knobs would create more gradual cuts or boosts to those 3 frequencies. You can cut out entire bands at a time to create tension and release to a track.
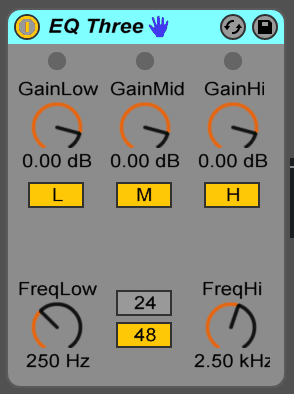
- You can also adjust the frequency range of each band with the FreqLo and FreqHi knobs. Depending on what Hz you use, that would be the cut off point for the various frequencies. Let’s say the FreqLo is at 600 Hz, then the low band would be limited to 0 Hz to 600 Hz. So you would be able to control what amount of highs and lows will come through in the mix.
- The section in between the FreqLo and FreqHi knobs are the 24 and 48 decibels. 24 decibels per octave will have a gradual cut on frequencies and the 48 decibels will have a harsher one.
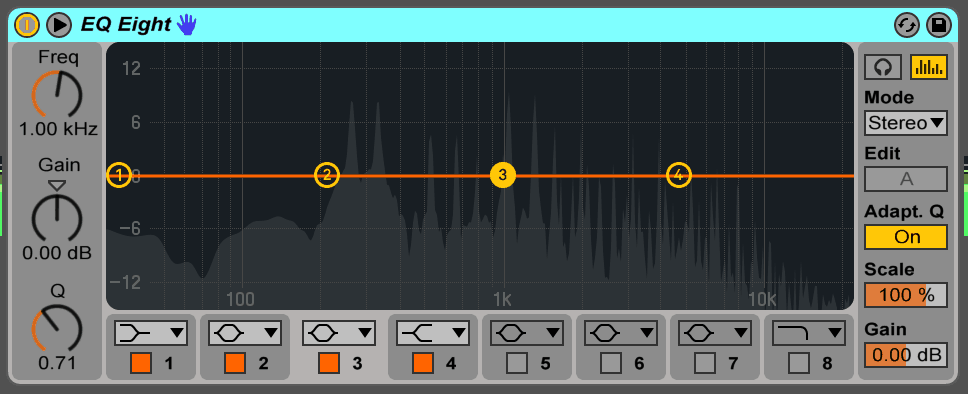
EQ Eight
- The EQ Eight (or Ableton’s parametric EQ) on the other hand, provides a lot more adjustable parameters to shape your frequencies. Here’s an extensive, in-depth article on how to use the EQ Eight.
Creative Effects for Sound Modulation
Now we’ll shift gears and explore an overview of the more creative audio effects to add texture and style into your sounds and tracks!
4. Auto-Pan
One effect for creating a stereo panning or synth-like sounds is the Auto-Pan Effect.
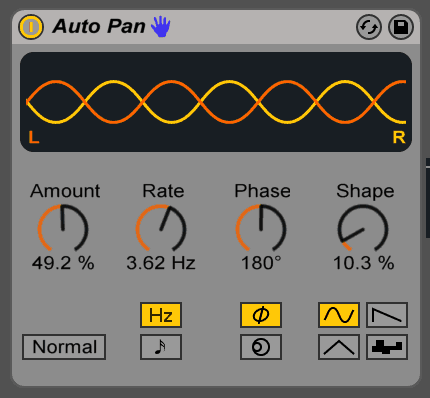
Here’s a great video from ELPHNT on how to create sidechain pump effect (sounds similar to a pulsing bass you’d hear in an EDM track) with the Auto-Pan.
Panning itself is used to clean up a mix by shifting your sounds to left or right speaker. The Auto-Pan Effect manipulates sounds by automatically adjusting the volume of the left and right channels depending on phase amount. If the phase is set at 180 degrees, the sounds from the left and right speakers will perfectly offset each other. Meaning, while the volume of one speaker is on, the other will be turned off. This gives the illusion that the sound is bouncing back and forth from one ear to the other.
5. Beat Repeat
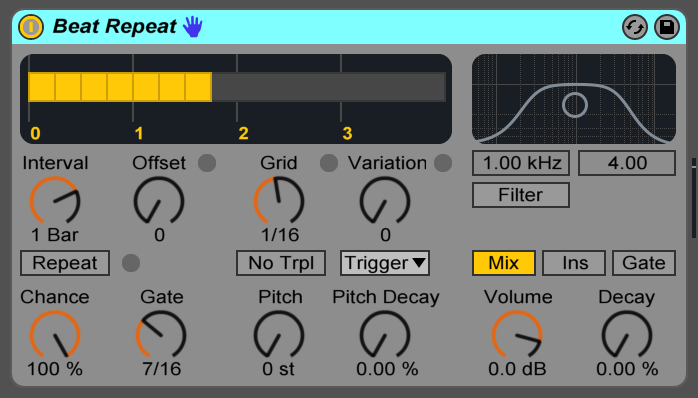
The Beat Repeat Effect is amazing for building glitchy, stuttering sounds, especially for drum beats. You can highlight a section of a drum beat or any recording and manipulate it to repeat multiple times. Those repeated sections can even be changed in pitch and randomized as to when they’ll repeat. Here’s video from Dubspot that explains how to use Beat Repeat and see how you can create your own experimental sounds just from a drum loop.
6. Vocoder
The Vocoder Effect is a really versatile tool for sonic manipulation. By combining two signals together (carrier + modulator) into a joined sound, you can manipulate vocals, drum beats, to other instruments into new sounds entirely.
If you’ve ever wanted to create robot vocals, this article provides a great guide on how to just that.

7. Overdrive
If you like producing distortion-heavy tracks, then the Overdrive Effect is exactly what you want. This effect was inspired by distortion guitar pedals and you can amp up the drive without losing any dynamic range (ratio of the softest to loudest sound in an instrument).

You can also view Ableton’s complete list of Audio Effects and how to use them here.
Now that you’ve learned some of the essential audio effects in Ableton, try applying them to your own workflow to see what creative sounds you’ll create!
This content is from the course Sound Production in Ableton Live for Musicians and Artists by California Institute of the Arts. Get started in learning new music techniques by enrolling below:

Sound Production in Ableton Live for Musicians and Artists
California Institute of the Arts
Experimental Foundations for Sound Design
Columbia University of the City of New York